So you’ve got a new camera! Or… you got a used one. Or… you pulled the old one out of the closet. Or… A friend gave you theirs because they can’t figure the damn thing out, which is not filling you with a lot of confidence but you’re willing to give it the old college try.
There are three parts to knowing how to really use a camera for something more than alcohol-fueled “selfies” at the bar with your BFF. These are the differences between photography and “taking pictures.” For the latter, any camera left on automatic, or just a mobile phone, will do. You’re reading this because you’re interested in photography as a creative pursuit, and in mastering your camera as a tool for this pursuit.
The first part is knowing what makes a good photograph. This is the intangible part, mostly a matter of taste. The rest is easier to learn than it is to teach. Deciding that you like someone else’s photograph, is easy enough. The next step is a lot harder. This involves looking at the same photograph with a technical eye, figuring out what about it makes it good and how the original photographer achieved whatever made this photo work for you.
To understand the next requires some basic understanding of how photography works, how different choices affects the final appearance of the photograph. With that knowledge, combined with a familiarity with the features of controls on your own camera, you can then figure how to duplicate the effect or even improve upon it, if you’re feeling especially ballsy.
The first part of this knowledge is understanding the basic mechanics of photography, how a gadget we call a camera turns light into an image. It’s not excessively complicated. It might seem like it involves a lot of incomprehensible numbers, but once you get a handle on what they stand for, they begin to make a little sense. Ultimately, what you really need to know is that, when number A is bigger than number B, it means this, and when it is smaller, it means the opposite.
The second part is knowing how those mechanics affect the final image and the third is how your camera controls those mechanics. I’ll touch on the second two in this article, but for now I will focus on the theory, on the why before the what and the how.
Exposure: Let There Be Adequate Light
Exposure is the heart of photography, which is basically the process of exposing a certain thing to outside light so that this thing can turn that light into an image. In ye olden days, the village elders first called that certain thing “witchcraft” but then settled on “film.” Now it’s a sensor chip inside one of your new-fangly digital thingamabobs. Either way, you need the right amount of light. Too little and the image is too dark; too much and it’s all washed out.
Photographers refer to the three elements that control exposure as the “exposure triangle.” They are, in order of their relative ease of comprehension, ISO, shutter speed, and aperture. By understanding how they interact, how changing one affects the others, you will know how to control the exposure of a photograph.
Stops in the Name of Light
Before we dive into these settings, however, we need to understand how photographers think about light. We compare one amount of light to another using a concept called the “stop.” A stop isn’t really a specific amount of light, but rather the relationship between two different amounts.
If there is twice as much light here than there is there, then we say that there is a one stop difference. If it was four times as much, then we have two stops difference. Every stop is twice as much light (or half as much going the other way) as the next one.
The key thing to remember is that light doubles or is cut in half with every stop. All three of our concepts, ISO, shutter speed, and aperture, work in stops.
ISO: Sensitivity Training
ISO controls the sensitivity of your camera (and by sensitivity, I don’t mean that it cries during the ending of Marley & Me). The more sensitive your camera, the less light is required to properly expose an image.
The setting takes its name from the way they rated film for its light sensitivity. A “100 speed” film was good for outdoors, while 400 and up was necessary for indoors, especially if you weren’t using a flash.
You might hear some gray-bearded photographer refer to this as the “ASA” setting. Back in the Triassic period, what we now call the ISO rating was only an American system, and was known as ASA, while there was once an international system called “DIN.” The D stood for “Deutsche,” which as you probably know is German for German. Like many things invented by Germans, the DIN rating was needlessly complicated. Eventually, everyone agreed that DIN was stupidly confusing and the whole world settled on the American system, which become the international standard, hence ISO. For the sake of the more stubborn Germans, the DIN system still exists as sort of an alternate ISO system.
The ISO numbers are easy enough to understand. An ISO setting of 200 is twice as sensitive as 100, requiring half as much light to capture the same image.
You may wonder why we simply don’t crank the ISO setting up as high as possible. For one thing, a high ISO setting may make it impossible to have the desired shutter speed or aperture, especially in bright sunlight.
There is another trade-off. In the old days of film, in order to make a film stock more light-sensitive, they had to make the chunks of silver halide in the emulsion bigger, which made the film grainy. For fine-grained images, like you might print in a magazine, you needed the slowest film you could get away with. Those pictures were often shot with ASA/ISO ratings of 25.
With digital cameras, there is a similar but subtly different problem. Higher ISO settings force the camera sensor to work harder, resulting in digital noise in the image, which is similar to but visually much less appealing than film grain. Digital tools like Lightroom have tools to take noise out, but other tools that put grain in. The tools that remove the noise can also destroy some of the detail in the image. While grain can be a good creative choice, noise is always bad.
As a result, you should use the lowest ISO setting you can get away with. The good news is that as new cameras come on the market, they get better and better at higher ISO settings. In the old days, films with ISO ratings of 1600 or higher were very rare and very, very grainy. Today’s top-of-the-line cameras produce very good results at ISO settings of 6400, and can go all the way to 102,400. This means that you can capture more photos in natural light without a whole lot of that natural light to work with. This is big for photojournalists and street photographers.
As a general rule, however, lower ISO is better for your photos under normal conditions, while high ISO is a useful tool for photos you couldn’t get without it.
Speed is Life
Shutter speed is not really an accurate word for what it is, since we’re really talking about the length of time the shutter is open when you push the shutter button, not how fast the shutter itself movies. It’s expressed in fractions of a second (or seconds), making shutter speed relatively easy to understand. You do have to deal with fractions, but it’s not too bad. All you have to know is that 1/50 of a second is twice as long as 1/100 of a second, and leaving the shutter open for twice as long will let in twice as much light. Simple, right?
Open Wide
Finally we come to aperture. This is the most important corner of the exposure triangle, in terms of creative control. Sadly, it is also the most complicated to understand.
The aperture is the opening is in the front of the camera and the aperture value describes how big that opening is. The larger that opening, the more light gets to the sensor/film. That’s the simple part. The tricky part of aperture is how they chose to label the different settings.
Unlike shutter speed, where the numbers represent an actual measurement, the numbers for aperture use the relationship between one actual number and another number to represent the real number in which we are interested, which would be the size of that circular opening behind the glass of your lens. However, the numbers we do use can be a bit confusing if you are trying to think about them in terms of stops, of one amount of light being double or half of another.
Aperture values do not appear to work in a logical way, but there is a reason for this. You remember what I told you about the old film speed system, DIN, invented by the Germans? Well, aperture values go back to the days when photography was not the domain of Japanese industrial giants, but of German industrial giants. Like the DIN system, our system aperture values was apparently invented by someone with a head for math and a sadistic hatred for the human race. Sounds like a German to me.
First of all, aperture values go from the smallest numbers, which represent the largest aperture (and the most light) to the largest number, which represents the smallest aperture (and the least amount of light).
Secondly, the numbers themselves are not linear, at least not in a way that makes sense to normal people. It might make sense to the kind of people who did well in high school geometry, but only back when they were actually doing well in high school geometry.
To illustrate the problem, here are the standard aperture values, in use ever since Adam and Eve were posting naked selfies from the Garden of Eden.
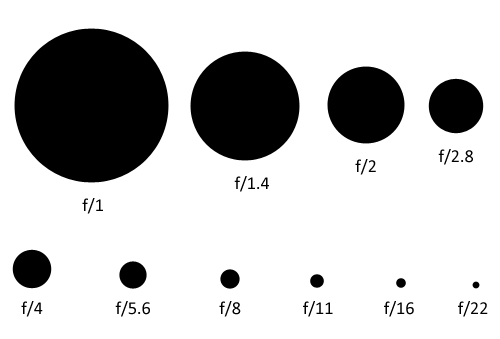
No one would blame you for looking at that and thinking that an aperture value of f/2 would logically be one stop more or less than f/4, because two is half of four. As you might have guessed, this is not the case.
Each aperture value in the table above is one stop more or less than the ones next to it. In other words, f/2.8 is one stop smaller than f/2, letting in half as much light, and one stop larger than f/4, letting in twice as much light.
As you can see in the image above, an f/1.4 aperture is always about 40% wider than f/2, but with exactly twice the area. The same applies all the way down the line.
Putting It All Together: Three to Tango
Never thought we’d get there, huh?
As I said earlier, ISO, shutter speed, and aperture work together as part of the “exposure triangle.” Any change to one of these affects at least one of the others.
If, for example, you change the ISO from 100 to 200, your camera needs half as much light to make an image. If you do not change your shutter speed and aperture, the picture will be overexposed. If the shutter speed is 1/200 of a second and the aperture is f/5.6, you could change either the shutter speed to 1/400 or the aperture to f/8 to compensate.
Typically, you will not change your ISO that often. You will usually set that just once, based on your conditions. 100 (or your camera’s lowest setting) for shooting in daylight or using flash, 400 to 800 (or higher) indoors and at night.
With your ISO set, you will then use aperture and shutter speed to control exposure. Depending on what you are shooting, you will probably use one to control the look of the photograph and then adjust the other to maintain the correct exposure.
Aperture is one of the main creative tools of photographers because it also controls something called depth of field. This is just a fancy term for how far behind your subject that things are still in focus. A large aperture (small number) like f/2.8 has a very shallow depth of field, which means that the background will be out of focus. This is often very desirable because it concentrates the attention onto your subject and eliminates distractions.
A small aperture (big number) like f/22 has a very deep depth of field, so that everything behind your subject is in focus, all the way out to Mars. This is important for things like landscape or architectural photography.
If you want to shoot with a wide-open aperture in bright sunlight, you definitely want to keep your ISO as low as possible. Even with an ISO of 100, you may need to shoot with a very fast shutter speed with an aperture like f/2.8. With a larger aperture, like the f/1.2 you might be able to get with an expensive portrait lens, your camera’s fastest shutter speed might not be fast enough.
Shutter speed controls how the camera captures motion. A fast shutter speed stops motion while a slower shutter speed allows motion to blur. Obviously, you would probably want to freeze the action shooting sports or some other fast-paced activity. For this kind of photography, a shutter speed of around 1/400 of a second or faster would be ideal.

ISO 100 f/9 @ 1/8 sec.
There are times when you want to capture a sense of motion. Shooting running water with a slow shutter speed, for example, gives that water surface a silky, sometimes even dream-like appearance. I shot this image of a water fountain at a shutter speed of just 1/8 of a second. See how the splashing at the bottom is smooth instead of sharply defined.
When shooting with the shutter speed this low, you will probably want to put your camera on a tripod. While you want some motion blur in the water, you also want the rest of the image to be rock steady.
This is one of those situations that explains why you don’t want to crank the ISO setting up too high. If the ISO setting were too high, it might not be possible to slow the shutter speed down enough, even at the smallest aperture, without over-exposure.
On the other hand, you might find that you cannot shoot with a fast enough shutter speed to freeze sports action, even with the aperture wide open. This can happen on cloudy days or late in the afternoon. That is when you might want to increase the ISO to 400 or so, even outdoors.
It is even possible to combine freezing the action with blurring the action. I shot the image below of a vintage World War II PBY Catalina at a shutter speed of around 1/160 of the second. This was fast enough to freeze the forward motion of the plane, but slow enough that the spinning propellers were blurred. Admittedly, the “Cat” isn’t that fast as airplanes go, but it’s still an airplane and it’s still flying fast enough not to fall out of the sky.
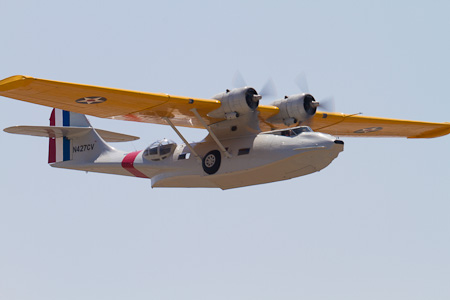
ISO 100, f/11 @ 1/160 sec.
When shooting handheld, you need to be aware of your shutter speed. Below a certain speed, you will need to put your camera on a tripod. How slow you can go depends on the lens you are using, but the rule of thumb is relatively easy. If you are shooting with a 300mm lens, your shutter speed should be 1/300 of a second or faster to shoot handheld. If you have a 50mm lens, you can shoot hand held at 1/50 of a second or faster.
In short, take the length of the lens and put “1/” in front of it. Some lenses have letters like “IS,” “VR,” “OS,” or “VC” in the name. These lenses actually adjust for your shaky hands, which allows you to cheat and hand hold your camera at slower shutter speeds. You still need to know the rule of thumb, however, to know how much you can cheat.
Now how does this apply to the real world?
All DSLR cameras have a little dial on top called the “mode dial.” This controls exactly how automatic or not your camera will be. Every camera has two modes called “Aperture Priority” or “Shutter Priority.”
Aperture Priority, labeled as either “A” or “Av” on the mode dial, lets you control the aperture while the camera picks the right shutter speed. Shutter Priority, labeled as either “S” or “Tv” on the mode dial, lets you control the shutter speed while the camera picks the right aperture.
I expect that most of you will spend most of your photographic life in one of those two modes. I will cover camera modes, plus how and when to use them or not use them, in a later article. For now, know that, for example, a wide-open aperture gives a very shallow depth of field, so you can set your camera to Aperture Priority, choose an aperture of f/2.8, and let the camera handle the rest.
You should also know that most cameras handle exposure not in full stops of ISO, shutter speed, and aperture, but in one-third or half stops. You can usually select which one. This means that, when selecting aperture in thirds of a stop, it takes three clicks of a wheel to change the aperture one whole stop, say from f/8 to f/11, or to change the shutter speed from 1/100 to 1/200.
I have glossed over a lot in this article. Depth of field is a much more complicated subject, and using Aperture or Shutter Priority modes can be more complicated than I make it sound. This article is just supposed to be an introduction to the subject of the exposure triangle. I’ll cover the more practical matters, such as putting it all into practice, in later articles.
Hopefully, you have found this helpful.