Let’s face it, when we get home from a shoot, we just want to throw the card into the computer, copy the photos over and start editing.
Whoa there, pardner. Rather than just dump your files into your “My Pictures” folder, it pays to take stock of the organizational tools that Lightroom offers, and take advantage of them. Putting a little thought into the first step now can make your life a lot easier down the road a ways.
You can stop reading now if…
You don’t give a rat’s patootie about what happens to your photos after you’re done with them. Seriously, I do have friends who utterly disdain the idea that photos have any value after they’ve been edited, uploaded and shared. On the other extreme, there are those who never throw anything away and archive every shot they take. Neither extreme is wholly irrational. Of course, because we are talking about photographers, who are by definition slightly irrational, neither position can possibly be completely sane.
Some people have organizational schemes that predate their relationship with Lightroom, and absolutely resist making any changes, even if Lightroom’s tool would make their life 1,000 times easier. Photographers can be creatures of habit, even to our own detriment.
The most common complaint I hear, and not just about Lightroom, is that the software “forces” you to do it “their” way. This usually comes from people who tried vainly to shoehorn Lightroom (or Picasa or Photoshop Elements) into an existing workflow, without bothering to see if the program in question can actually streamline their process.
How I Did It – By Victor Frankenstein
With apologies to Mel Brooks, my goal is to walk you through my Lightroom workflow, one step at a time, and explain my thinking for each one.
Among my photographer friends, I have a reputation for being very quick to get finished shots online. One friend likes to joke that I download and edit my photos while I’m driving home. I would if I could (if it weren’t totally illegal and dangerous!).
The simple fact is that I have a very efficient workflow that takes maximum advantage of the tools that Lightroom offers. This workflow allows to quickly find the best shots from a given shoot and edit only those shots, not wasting time on shots that no other human being will ever lay eyes upon.
Importing Photos Already on the Computer
There are two reasons you might do this:
- You’ve just installed Lightroom for the first time and you need to get your existing photo library into the Lightroom catalog.
- You use another program to get your shots from the card to the computer. I know people who do this but, in my opinion, Lightroom’s import tools are just superior, especially in version 3.
Therefore, I will focus on how I accomplished #1. Lightroom has three ways of importing files already on the hard drive.
- Add – This leaves the photos in their current location and simply adds the files to the Lightroom catalog. If you’re happy with your existing file structure, or still need other programs to find your existing photos, this is a good choice.
- Move – This creates a copy of the original file in a new location and removes the original. This is good if you want start somewhat fresh with Lightroom and start working from an external hard disk, which was my thought process when I first started using the software. The risk is, of course, that something could go wrong (it happens…rarely) and one or more of your precious originals could be lost forever, which is why I went with the third choice.
- Copy – Exactly the same as move except without all the risky deleting of originals. This allows you to delete your originals once you’re confident the copy was successful (or keep the originals as backup).
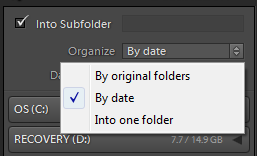
Okay, assuming you’re going to copy your files (or move them, you wild thrillseeker!), the question is: where to?
- Into One Folder – Assuming that you’re importing a couple years worth of existing photos into a new copy of Lightroom, this is probably not a viable option (unless you just keep your photos in one big folder anyway… in which case…you’re weird). This is a better choice for importing new photos from a card.
- By Original Folders – This keeps your original folder structure intact. A good choice if you have a filing system that you’re happy with.
- By Date – This is what I used, on the assumption that I would be using Lightroom’s other organizational tools to keep track of my photos. There are several options. I currently use the one that creates a separate folder for each year and, inside that, a folder for each date, named like this “2011-04-19.” You can have separate folder for each month and day inside of that. I found that to be overkill for the truly anal retentive.
Importing New Photos from a Card or Camera
Lightroom 2 had a separate screen for importing from the hard drive vs. a card or a camera. The options are slightly different, but the process is pretty much the same… which is probably why they ditched the separate screens for version 3.
When you’re importing from a card, the Move and Add options have gone away. You can’t just add the photos on the (most likely correct) assumption that you don’t want to simply leave new photos on the card. The Move option is gone because Adobe assumes (again, mostly likely correctly) that the photos on the card are your originals and you don’t want to risk them by letting Lightroom delete them willy-nilly.
As a general rule, I like to leave copies of my photos on the card until I need the card again, at which point I format the card in the camera, which takes all of a few seconds. It’s quicker and safer than deleting them using a computer.
That leaves us with two ways to get photos from the card off the card and onto the computer.
- Copy – This exactly the same as above. Lightroom creates new copies of the photos where you tell it to.
- Copy As DNG – This is also the same, except that Lightroom converts the file from the original RAW format (assuming your using RAW) to Adobe’s more universal DNG format.
The advantages of this are A) DNG files tend to be slightly smaller than RAW and B) Adobe will presumably always support DNG even in the unlikely instance that they stop supporting your shiny new Nikon D700 or Canon 5D Mk II. The main disadvantage of converting to DNG is that it basically doubles the time amount of time it takes to import your photos from the card. Maybe that doesn’t hurt if you’ve got 30 shots, but if you come back from the Miramar Air Show with 1,700 shots, as I did in 2009, that’s gonna add up. You can always convert to DNG later, after you’ve sorted through the shots and discarded the losers.
Of course, if you’re shooting JPEG for some inexplicable reason, then converting to DNG doesn’t make a lot of sense and reading the previous paragraph was a complete waste of your time.
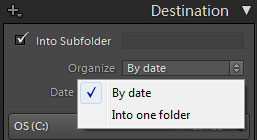
Your choices for the destination are:
- Into One Folder – If you have a filing system that you like, and it’s one that Lightroom can’t duplicate, this is your best shot.
- By Date – Again this is the option that I use. It has the simultaneous advantage and disadvantage of segregating files by day. This means that the photos from a long trip might be spread across several folders. If you shoot every day, or nearly every day, folders named by date may not be that helpful in locating a photo from a specific shoot. Again, I rely on Lightroom’s internal tools, especially keywords, to organize my photos, so this is not an issue for me.
Since the folder structure on the card is usually cryptic at best, which is another word for useless, the By Original Folders option isn’t that useful at this stage, so Adobe helpfully left it off.
Once you have decided where you’re going to put your photos, you still have a few options left before actually start importing. But since this post is already long enough, I’ll save that for next time.
Laters!


