I just recently upgraded to Lightroom 5 after only a month with Lightroom 4. I upgraded to version 4 right after 5 was announced because I heard that version 5 didn’t run on Windows Vista and my main computer was still stuck with that operating system. Then I remembered I had a Windows 7 upgrade disk on my shelf, so I said “screw it,” and got the free upgrade from Adobe.
Since I’ve only recently moved from Lightroom 3, part if this will include my impressions of features that were new with version 4 as well as the new parts in 5.
Basic Processing
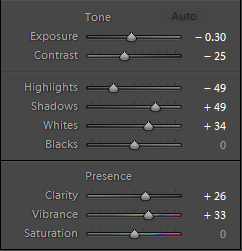
The new tone controls in Lightroom 4 and 5.
The biggest change in version 4 was the move to RAW process version 2012. This changed how the basic tone controls work at the top of the develop module. Instead of the old Recovery, Fill Light, and Brightness sliders, we now have Highlight and Shadows. Dragging Highlights to the left “stretches” the brighter areas of the photo toward the mid-tones and does an amazing job of recovering detail from blown-out highlights; far better than the Recovery slider every did. Likewise, dragging Shadows to the right opens up the shadow detail. You then use the Whites and Blacks sliders to make sure the ends of your tonal range snuggle right up against absolute white and black. I’ll go into more detail about how I use these controls in another article.
The new process version is such an improvement that I can’t recommend enough that you upgrade to version 4 or 5. If you are a Photoshop user, you need to make sure that you have Adobe Camera Raw version 6.7 or later.
Radial Filters
The old versions of Lightroom had the Graduated Filter, which applied adjustments to part of the image, but the separation was a gradient along a straight like, allowing you to darken the sky along the horizon, for example. Lightroom 5 has the Radial Filter. As you can probably guess from the name, it applies the same kinds of adjustments to a circular or oval-shaped area.

Using the Radial Filter to apply a custom vignette.
Actually, it applies the adjustments outside the selected area. I think Adobe’s thinking was that you could use the filter to apply a vignette that was not centered in the middle of the photograph. However, everyone I see demonstrate this feature always want to apply changes inside the circle. This is easy to do. Just check the Invert Mask button, but I think Adobe goofed slightly in making the default be outside the filter instead of inside, where most people will probably want to make the changes.
Either way, it lets you apply changes that would have previously required a trip to Photoshop.
Auto Upright
This addition to the Camera Profile tools allows you to automatic straighten pictures of buildings or straighten that crooked horizon. It doesn’t work with every photograph, but when it does, that’s one less thing on which you have to expend brain power.
Smarter Healing Brush
Before version 5, you could only apply the healing and clone tool, called Spot Removal, to circular areas. It was great for dust spots on the sensor or small blemishes on the skin, but long irregular areas like wrinkles still required a trip to Photoshop.
No more. You can now “paint” any irregular shape you want, then select an identically-shaped area of the photo to replace it. The Spot Removal tool now functions very similarly to (and in some ways much more intuitively than) the healing tools in Photoshop.
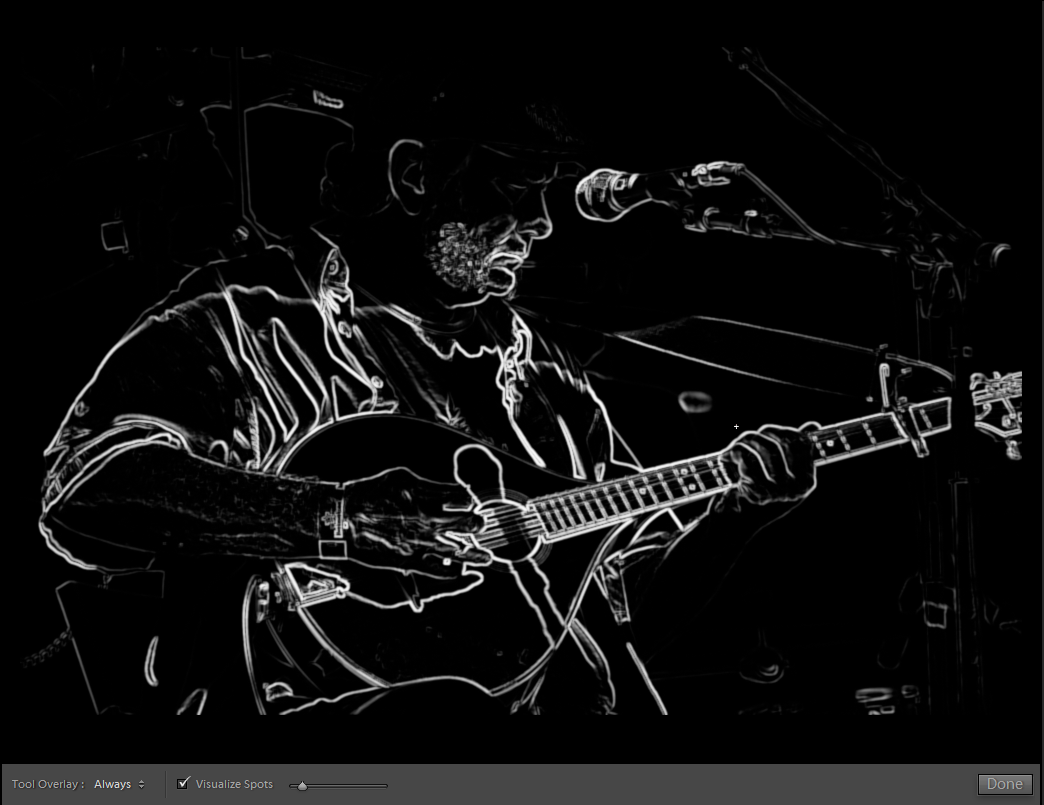
Visualize Spots
Haven’t cleaned your sensor lately and you have to shoot at small apertures for some reason? This new little feature is very handy for making sure you catch every last little blemish.
It’s technically part of the Spot Removal tool. When you are using the tool you will see a check below the image called Visualize Spots. If you don’t see it, press the “T” key to turn on the tool bar.
With this engaged, Lightroom shows you image as a black-and-white with the smooth tones in black and all the edges highlighted in white. It’s then easy to see where the dust spots are and get them all.
Smart Previews
If you use Lightroom on a laptop and store your photos on an external drive, meaning that you are sometimes away from your originals, this feature should help ease the separation anxiety. Smart previews are copies of your photos stored with your catalog, approximately 2048 pixels on the long side, that let you do three things you couldn’t do before if you were disconnected from your original RAW files.
- Export – As long as the exported images are smaller than the Smart Previews, Lightroom can export copies just like it could with the original.
- Print – You probably can’t make a 24 x 36, but an 8 x 10 should be no problem.
- Edit – Yes, you can now go into the Develop Module and adjust to your heart’s content. Lightroom remembers the changes and automatically applies them to your original RAW files.
Smart Previews help cut the umbilical and still remain productive when you’re on the road.
Other Features
Lightroom 5 has two other major changes to features that I general don’t use, so I really can’t pass judgment on how useful they are.
- You can now incorporate video clips into a slide show.
- The Book module is supposed to be improved over version 4.
Conclusion and Overall Impressions
Lightroom 5’s new features are both cool and useful. The ability to make fewer trips to Photoshop and work extensively with your photos when you are away from your desk (if you actually have a desk) make this upgrade kind of a no-brainer.
The upgrade to the RAW processing found in version 4 is still a bigger deal, in my opinion. If you are stuck on version 3, I think it’s past time to upgrade if you can.