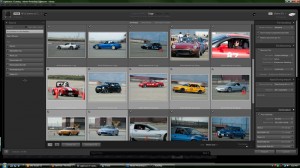
Ok, assuming that you know where on your computer you want your photos to go, it’s time to get down to business and get those photos into Lightroom.
Connect Camera to Computer or Use a Card Reader?
I have found that not only is copying the photos directly from the camera to the computer much slower than using a card reader, but I’ve often found it to be kind of flakey and unreliable. Since, most new computers come with a built-in gazillion-in-one card read, this is a no-brainer.
Select Which Photos to Import
Normally, this ain’t such a big deal. I almost always want to import every photo on the card, but on rare occasions I might have shots from more than one shoot on the same card and want to handle them separately.
So, to selectively import only some of the photos, uncheck those that you don’t want to import this time. To check a group, select the first photo, shift-click on the last photo, then press the space bar to toggle checks for those photos on and off. You can also right-click somewhere in the group and select “Uncheck Photo” from the pop-up menu, but for some unknown reason, this only toggles one photo at a time. Pretty useless if you have hundreds on the same card.
Making a Backup during Import
You can tell Lightroom to make a second copy of each photo in different location. Whether you back up now or later, just make sure you back up.
To do it now, check the box and select a location for the backup.
Renaming Photos on Import
If you have ever looked at the contents of your memory card when it’s connected to the computer, you know that the file names are something useful like “IMG_1234.CR2,” so renaming the files at this point is one of the most helpful things that Lightroom does at this stage at the process.
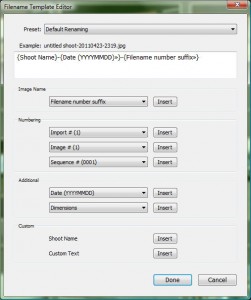
You have the option of picking one of the Lightroom’s preset renaming templates or creating your own. If you create you own, you have numerous options for the pieces of information you can include in the new file name.
The most useful are:
- Date
- Original File Number or Sequence Number.
- Custom Text
- Shoot Name
The “shoot name” is a new wrinkle in Lightroom 3. How it exactly differs from “custom text” is a little beyond me, but now you can include two separate pieces of custom information in the file name. I guess you could use the shoot name for something like “Fashion Shoot” and use the custom text for each model.
What I usually include in my files are the shoot name, the date in YYYYMMDD format and the original file number. You could use a number from 1 to however many photos your importing, but for some reason I like to use at least some part of the original file name.
Applying Develop Presets while Importing
After you’ve been working with Lightroom long enough, you’ll probably discover that there are adjustments you make to almost every photo you shoot. Once you realize what these are you can turn them into what’s called a “develop preset,” which is just a group of saved settings which can then be applied instantly to other photographs.
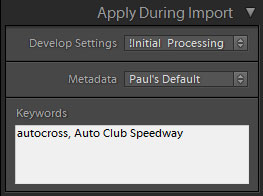
Lightroom lets you select one of these presets and apply it to every photo as it’s being imported. I know that I’m probably going to make a tone curve adjustment to almost every photo so I’ve saved a basic one and, when I remember, I apply that during import. I can fine tune the adjustment later during editing, if necessary. If it’s not necessary and the photo looks good as is, I’ve just saved myself a few seconds per photo.
I’ll cover things like develop presets and tone curves in more detail in later articles.
Applying Metadata Presets while Importing
Metadata is just information stored in the picture file. You never see if don’t go looking for it. Your camera automatically stores what’s call EXIF data: a bunch of metadata for every shot you take: camera make and model, time and date, aperture, shutter speed, ISO setting, camera mode, what lens you were using, and the focal length. That’s one beauty of digital: your camera takes care of the lot of the record keeping that photographers knew they should be doing but never bothered to do.
There is also room for more that your camera doesn’t know about, like your contact and copyright information.
Before you start stuffing your photo files full of personal information, remember that this information will probably be visible when you upload the photo to Flickr. In other words, you might not want to include your home phone and address. If you make money with your camera (or just want to), you probably just want your business phone number and e-mail. If you have a business address or PO Box, then it’s okay to include that.
Generally, I just include my copyright information, business phone number and email, plus my website address. I also include a color label (I’ll explain more about those in a future post) and a 3-star rating (In my work flow, keepers are 4 to 5 stars while rejects are 1 to 2 stars). I then modify these ratings and labels during my next step, the sorting process.
Adding Keywords while Importing
Keywords are just words that can describe, in as little or as much detail as your personal OCD demands. I will say that, if you have tens of thousands of photographs in your library, diligent keywording will pay handsome dividends. It doesn’t matter how ingenious your organizational scheme is, one day you will ask yourself, “Where the hell did I put that brilliant photo I took two years ago?”
Well, if you remember it had clouds in it, and you have been keywording your photos, then a quick search for “clouds” will probably turn up that photo in no time flat.
At this point, it only helps to apply those keywords that apply to every photo on the card. For example, if you were a wedding photographer, then the name of the client, the location, perhaps what package the client bought, and the name of the wedding planner who recommended you. Later you can go back and more specific keywords to individual photos.
Even if you don’t have tens of thousands of shots in your library, it’s easier to start doing this sooner than later.
That’s about it for it for importing (or at least all that I bother myself with). At this point, just click the Import button and, if you’ve got a lot of new photos, go get a cup of coffee.
My next step is sorting through the photo and identifying the keepers and the rejects. I’ll cover that in the my next post.


